


How to Get Rid of Spider Mites on Plants (Fast, Organic Fixes)
Updated September 2026
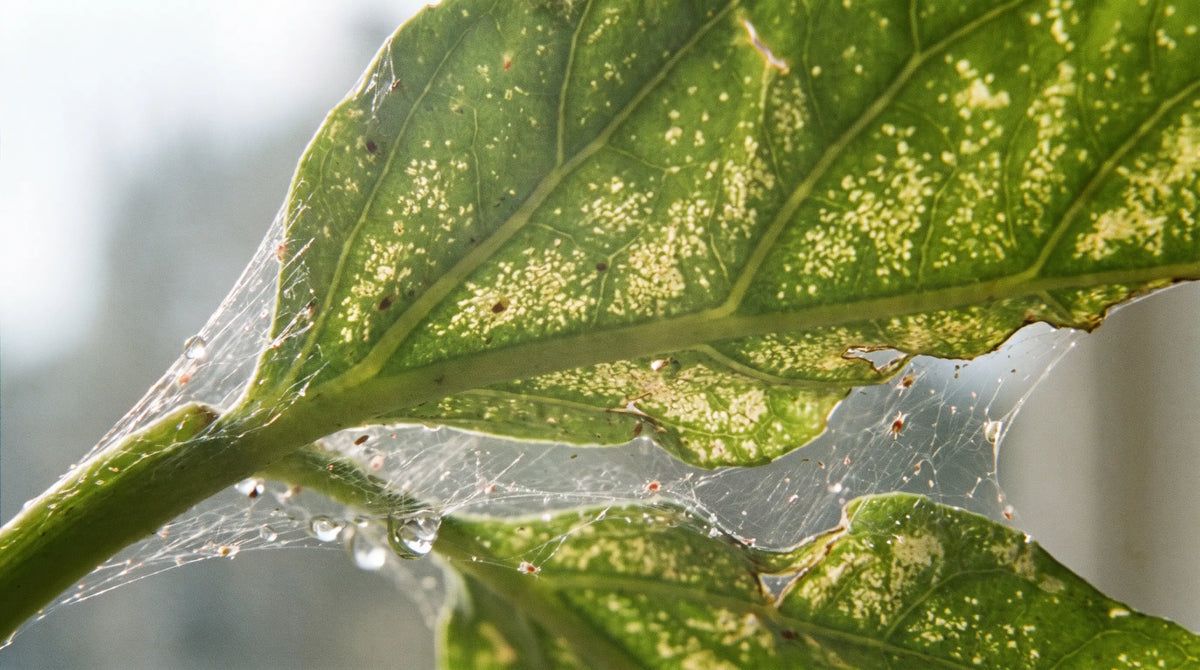
You water, you feed, you check on your plants like a proud parent, and then one morning the leaves look dusty and faded with tiny pale flecks all over them. Tip a leaf toward the light and a fine web catches the sun. That is spider mites, and they can go from a few stragglers to a full canopy takeover in about a week when it is warm, so moving now genuinely saves the plant.
The good news is you do not need harsh miticides to win this fight. Many chemical sprays only knock down the adults and leave the eggs untouched, which is exactly why people spray once, think they have won, and then get reinfested. A cheap water wand, some soap, a bottle of neem, and the patience to repeat on schedule will beat them. Here is how.
How to know it is actually spider mites
Spider mites are barely visible specks, most no bigger than a grain of ground pepper. A very common troublemaker is the two-spotted spider mite, and despite the name these are not insects at all. They are relatives of spiders, which is why standard bug sprays often disappoint. They live and feed on the underside of leaves, puncturing individual cells and draining the contents. That feeding shows up as tiny pale dots called stippling, and as it spreads the whole leaf goes bronze, dull, and brittle.

The dead giveaway is fine silky webbing strung between leaves, stems, and growing tips, but by the time you see obvious webbing the population is already large, so do not wait for it. To catch them early, hold a sheet of white paper under a suspect leaf and tap it firmly. If the specks that fall start slowly crawling, you have got mites (dust and dirt will not move). Warm, dry, dusty, still air is exactly what they love, which is why they explode on houseplants near a heat vent and outdoors in a hot, rainless stretch.
Step 1: Isolate and rinse
Move the affected plant well away from its neighbors. Mites spread by crawling and by hitching a ride on your sleeves and hands, so quarantine matters more than people think. Then use water against them, because they cannot cope with being knocked around and wetted down. Take the plant to a sink, hose, or shower and blast both sides of every leaf with a firm stream, spending most of your time on the undersides and the leaf axils where they shelter.
A thorough rinse strips off a large share of the mites, plus eggs and webbing, in one go. The catch is the eggs. They hatch every few days in warm weather, and no rinse gets all of them. So repeat every two to three days for at least two weeks. Skipping days is the single most common reason an outbreak comes roaring back.
Step 2: Hit them with soap or oil
For the mites that cling on, mix a simple insecticidal soap spray: about one tablespoon of pure liquid soap (a plain castile or true soap, not a detergent or a degreaser with additives) per quart of water. Coat the undersides of the leaves until the spray beads and drips off. Soap only works by direct contact, dissolving the mite's protective coating, so it dries harmless within minutes and coverage is everything. A missed leaf underside is a survivor. Test a couple of leaves first and check them a day later, since soap can burn tender or fuzzy foliage.
Neem oil is your other workhorse. It smothers mites and their eggs, and it interferes with feeding and molting so survivors mature and reproduce poorly. Always spray in the evening or well out of direct sun, because oil on a leaf in full sun scorches it. Shake constantly as you go so the oil stays emulsified, and repeat every five to seven days until fresh stippling stops appearing. Alternate soap and neem across your treatments so you are hitting the mites two different ways and never giving the population a quiet week to rebuild.
Once you have cleared them out and want a fresh, vigorous start, sowing new plants from clean seed usually beats nursing a badly chewed one back to health.
Sale

Summer Vegetable Seeds Variety Pack – Non-GMO HeirloomBest ValueA clean, vigorous restart. This mix gives you plenty of easy warm-season crops to grow strong plants that shrug off pests.
Price$27.99
Sale Price$24.99
Step 3: Bring in reinforcements
Nature already built a better mite hunter than you are. Ladybugs and green lacewing larvae will eat mites, but the real specialists are predatory mites, which do nothing but hunt spider mites and can clear a colony without you touching a sprayer again. In a greenhouse or a large outdoor bed, a well-timed release is one of the most reliable long-term fixes there is.
The one rule that people break: do not spray soap or neem in the same week you release beneficials, because both will kill your helpers right along with the pest. Knock the worst of the outbreak down first with a rinse and a spray or two, wait several days for residues to clear, then release the good bugs and let them mop up the survivors and stragglers you cannot reach.
Step 4: Fix the conditions that invited them
Spider mites thrive in hot, dry, dusty, stagnant air, so change the room, not just the plant. Raise humidity around houseplants by grouping them together and setting them on a tray of pebbles and water (keep the pot base above the waterline). Get air moving with a fan, since still air suits mites and helps nothing else. Wipe or rinse dust off leaves, because a dusty leaf is both a mite highway and a hiding place. Outdoors, water consistently and do not let plants slide into drought stress, since a thirsty, stressed plant is a mite magnet and heals slower once they arrive.
Go easy on the high-nitrogen feed, too. It sounds backwards, but pushing lush, soft, over-fertilized growth gives mites exactly the thin, tender tissue they feed on fastest. A steady, balanced feeding hand keeps foliage tougher and less inviting.
The best defense: strong, healthy plants
A vigorous plant shrugs off a light hit of mites and outgrows the damage. A weak, stressed, root-bound, or thirsty one gets overrun. That is why starting from quality seed and growing sturdy, unstressed plants is your real long game against every pest, not just mites.
Cucumbers, tomatoes, and beans are classic mite targets once the weather turns hot and dry, so choose reliable heirloom varieties, space them for good airflow, avoid overhead evening watering that lingers, and get in the habit of flipping a few leaves over every time you walk the bed. Catching the first flecks of stippling is worth more than any spray.

Marketmore 76 Cucumber Seeds – Non-GMO HeirloomGarden FavoriteA dependable heirloom cucumber. Give it airflow and steady water and it stands up well to a hot, mite-friendly summer.
Price$4.99
Sale

Cherry Tomato Seeds – Large, Non-GMO HeirloomNon-GMO HeirloomProductive heirloom cherry tomatoes. Keep them healthy and unstressed and they resist mite pressure far better.
Price$4.99Starting at$3.99
Quick reference: organic mite fixes
| Method | Best for | How often |
|---|---|---|
| Water blast | First response, all plants | Every 2 to 3 days |
| Insecticidal soap | Active mites on contact | Every 5 to 7 days |
| Neem oil | Mites plus eggs and feeding | Every 5 to 7 days |
| Predatory mites | Greenhouses, big beds | One or two releases |
| Humidity, airflow, dust control | Prevention | Ongoing |
Stay consistent for two to three weeks so you outlast every batch of hatching eggs, and you break the breeding cycle for good. Catch them early, keep your plants strong, and spider mites stop being the thing you dread every summer.
Frequently asked questions
What kills spider mites instantly?
A firm blast of water knocks off most mites, eggs, and webbing on the spot, and insecticidal soap kills the stragglers on contact by dissolving their protective coating. Neither is truly one and done, since eggs keep hatching. Repeat every two to three days for a couple of weeks or the survivors just rebuild the colony.
Can plants recover from a spider mite infestation?
Yes, as long as you catch it before too many leaves go bronze and brittle. Snip off the worst-damaged leaves, treat on schedule, and fix the dry, dusty conditions that invited them. Healthy new growth usually pushes out within a few weeks. Plants stripped nearly bare rarely bounce back and are often better replaced.
What naturally repels spider mites?
Humidity and moving air are your best deterrents, since mites thrive in hot, dry, stagnant conditions. Consistent watering, clean dust-free leaves, and a fan on houseplants all discourage them. Neem oil disrupts feeding, and beneficial insects like predatory mites and lacewing larvae stop populations from building up in the first place.
Why do my plants keep getting spider mites?
Usually the conditions keep inviting them back: dry stagnant air, dusty leaves, drought stress, or heavy nitrogen feeding that pushes the soft growth they breed fastest on. Missed eggs also hatch after you stop spraying too soon. Fix the environment, water steadily without overfeeding, and keep treating for two to three full weeks.
Does neem oil work on spider mites?
Yes, as part of a routine rather than a single fix. Neem smothers mites and eggs and interferes with feeding and molting so survivors reproduce poorly. Spray both sides of the leaves in the evening to avoid leaf burn, shake it often to keep it mixed, and repeat every five to seven days, since one pass never clears them alone.

- Choosing a selection results in a full page refresh.






























 Easy Returns 30-day guarantee